I excluded Seagate drives (except where they’re the only drives in class)
Amazon’s search got much worse, and they started having listings for refurbished drives
Corrected paper archival density, added photographic film
Added SSDs (both 2.5″ and M.2 formats)
Prices did not go up or down significantly in the last 6 months.
Some conclusions that are useful to know
The cheapest option is tape media, but tape reader/writers for LTO 6, 7, and 8 are very expensive.
The second-cheapest option is to buy external hard drives, and then open the cases and take out the hard drives. This gives you reliable drives with no warrantee.
Blu-ray and DVD are more expensive than buying hard drives
I’ve been keeping a time log since somewhere around 2011. A time log is a journal with a complete record of everything I do. I’ve become very consistent about it, so this seemed like a good time to write up my current habits for anyone interested.
This is going to be a mixture of information about life-logging, how I organize things, and my current schedule, because they’re not really separate things.
There’s an interesting story about how I systematically broke everyone one of my habits, and it took me 17 years to get in a daily routine after that, but that’s a story for another time.
If you’re curious, I’d guess it takes me 2 hours a week spread out to do my life-logging, 1 hour to type it up, and 1-2 hours to do my weekly review. In my mind the original life-logging doesn’t cost me anything because it’s so automatic, it’s zero-energy, and it has some psychic benefits. By psychic benefits I’m talking about the same kind of thing you get from GTD–you’re not constantly thinking about or trying to remember things that are already written down in a trusted system. Typing it up and review are not free.
Time log (2011-)
I keep a written (pen and paper) time log which I normally just call my “log book”. Each entry has the current time and what I’m doing. I typically record an entry either when I start an activity, finish one, or notice I’ve switched activities. I’m on volume 9.
Today’s page starts like this (italics are censorship or words added for clarity):
Date: 2019-12-17, Tue
12:02pm
Woke up on my own slightly before alarm. Dream about […]. (7h12m sleep)
[100ml yellow rockstar recovery. (33mg caffein, 400mg taurine–from front material)]
Morning data log (see below)
Brushed teeth
12:55pm
Cancelled torrent verification–I already know this will fail
Responded to gnu coreutils ‘date’ thread
health stuff
2:02pm
Trying qutebrowser. Feels very productive.
2:04pm
[Coke Zero Vanilla, 1 can]
I’m not fastidious about what the time represents. The questions I most often ask are “when did this happen roughly” and “do I have any big portions of my day I’m not time-logging”. I’m less concerned with exactly how long I spent doing each particular activity.
There are some things I try to consistently write down every single time, including:
Exactly when I woke up, especially if I don’t use the computer first thing (see “Sleep Log” below)
Any dream if I remember it
Any food or drink I consume, with enough information that I could generate nutritional facts if I wanted. I omit food amounts if it’s a pain to measure. 1 package of ramen: yes, 125g chicken curry: no. I put food and drinks in hard brackets: []
Watching a movie, TV show, youtube, or reading a book. I used to underline these, now I’m trying putting them between underscores: _. I’m switching to write these in a computer-understandable way but it’s a work in progress.
Anything health-related, including symptoms, drugs I took, and bathroom visits. Drugs are a type of food [], the rest is freeform.
Travel from point A to B
Phone calls. I don’t always manage this one. While you’re picking up the phone is a really garbage time to try and write something.
Any time I change timezones
Any time I work on a project for more than a couple minutes
“Where did that time go”: one of the goals here is to have no huge gaps. If I spent time browsing the web or researching, some vague notes on what about. If I talk to someone in person, noting who and possibly what topics we talked about (talking in person often feels like minutes in my head but hours on the clock).
Here are things I don’t write down:
Information that I’ve put elsewhere. See below for specifics on what else I have! This one isn’t hard and fast, but I’m a believer in things being in “exactly one place” as much as possible–I do make some exceptions since I’m working with paper
General-purpose notetaking, thoughts about what’s going on, TODO lists, etc. This is just a boring ol’ record of time. I do sometimes jot down TO-DOs when out of the house since this is the only paper I carry on me, but at the rate of 1-3 a week. I also may write down where I’m at in a really long-running computer project, just to make sure I can find it later.
Anything a human shouldn’t have to write or read. For example, I could write down the youtube URL or the UPC code of everything I buy… but nobody has time for that, and I’d only write it down wrong.
At the front of the book I have a table with guides to abbreviations, ingredients in things I have often (ex. caffein amounts or recipes). In the back is my bookkeeping section (see below).
I am currently using the Leuchtturm1917 gridded notebook, with date labels at the top of the page. I’ve been experimenting with felt micron pens–I’m looking for something that can write easily, but won’t smear when I close the book. I’ve used Moleskins in the past–I stopped using them because 2 of 5 split at the spine for me. Leuctturm seems a bit better but more expensive–time will tell.
One a week, I type up my time log up to the last page. I’m working on my backlog slowly. This lets me search more easily. I have plans to someday cross-reference better in a computer system (for example, include nutritional info, link to youtube videos, etc).
Bookkeeping (2019-)
Fun fact: b-oo-kk-ee-ping is the only word in the English language with three consecutive double letters. Bookkeeping is keeping a record of what you earn and spend, or what you buy and sell.
For the most part, I pay for everything using a credit or debit card, which I’ve been doing since 16 so that I have a financial record for my own benefit. Most banks offer an easy export. I get paper copies, then once I download the PDFs from my bank, throw out the originals (I’ve checked one or two match the PDFs by hand). I use mint.com for the purpose of having a CSV export from my bak statements. I used to put this export online (currently broken, check back soon).
Starting a few months ago, I started keeping a weekly record by hand. Every time I spend money, I’ll put a $ symbol in my time log,
2:21am Amazon $
and add a bookkeeping entry (real thing is prettier).
2019-12-15, Sun
[ ] Amazon -29.21 -236.07
Choline citrate, 500g
The entry includes:
The date (2019-12-15)
Where I spent the money (Amazon)
How much money (29.21)
How much total I’ve spent this week (236.07)
What I bought (Choline citrate, 500g). If it was more than one thing, how much each item cost. I’ll try and write price-per-pound if I’m buying bulk food or meat. If I’m buying more than one of something, I’ll write how many I bought and how much each is. I’d like to consistently write down how much of something I got (ex. 16oz of cheese) but I don’t at all yet.
If it’s something that needs to be delivered, I’ll write a checkbox. Then when it arrives, I’ll check the box and write down the date it arrived to the right. This way I can easily scan and see if something never got delivered.
Since I use the same book for my time log and my bookkeeping, bookkeeping goes from right to left, two pages per week. At the end of the book, I keep
a running record of any debts I owe
any undelivered packages from the previous log book
During my weekly review process, I copy this information to my (digital) weekly review and add it up by category to check against my budget. I used to check it against my bank statements, but it takes forever and it’s easier to just be really good about writing down everything to start with. Checking totals and category totals is pretty time consuming the way I do it, I’ll probably automate it soon.
Budget
My current categories are:
taxes, bills, rent: Predictable expenses, no need to check these on a regular basis. I separate out medical bills in my summary, which are not regular.
travel, hard drives, moving: Big but one-off expenses. Currently I don’t have a way to budget these.
charity: I aim for 10% of my income after taxes (a tithe)
other: The main budget category, I try to keep this at $1000/month ($240/week). I actually break it down into categories like “food”, “groceries”, and “luxuries” so I know what happened, as well as pulling out any single big expenses.
Weekly Schedule (2019-)
My current schedule is weekly:
Monday: Do meal planning for the week, and grocery shopping for the week if needed.
Tuesday: Cook food for the week.
Thursday: Batch day.
Do all the small chores (<1 hour) on one day. I aim for around 2-4 hours of chores, but I’m fine skipping a batch day if I don’t really have anything. I almost always clean my room and do laundry at minimum. I also have a running list of small tasks: call the doctor, clean the fridge, fix SSL certs.
Friday: Review day.
I’ll do a weekly review, and a monthly one if it’s the last weekly review of the month. Then I’ll type up the timelog up to that point in time. For my weekly review, which I do on my computer, I write down
How much sleep I got on average
What I did each day of the week (summary of that day’s time log). Typically once I cut out really boring things (brush your teeth), food, movies, etc there’s not all that much left.
Accomplishments. Anything I got done this week. Also, any big milestones reached (finished X) even if the last step wasn’t that impressive.
Reflection/things learned: Did anything major happen? Did I learn any new facts? This is my time to look at the big picture and thing about how my life is going lately and where I’d like it to go. Also, if anything especially good/bad happened, I try to think about why and how to make things go well next time.
Finances. I copy down my expenses for the week and total them by category.
Saturday: Nothing planned.
Sunday: Nothing planned.
I haven’t done batch cooking in a while, but I’m also trying to run out my food supplies because I’m about to move, so we’ll see if it sticks around.
Daily Log (2019-)
Every morning, I record:
The date and time I’m recording
How much sleep I got (but not when I went to sleep or woke up)
What day it is in my schedule
The temperature of the room
My body temperature (am I running a fever?)
How much exercise I got yesterday, in minutes (and what type)
My weight
I don’t think it matters that much how you do these measurements, but it’s important to be consistent (for example, weight with clothes on/off?)
If I have a specific habit I’m trying to pick up (say, brushing my teeth twice a day or meditating) I might record that for a while too each day. I used to record a mission for the day, but I dropped the habit.
Automatic Logs
I put all my computer logs in a single combined format, and sync them to a single location, starting in 2019. The format is basically <date> [<log name>:<computer name>] <Log entry>. I don’t have a great process to view logs yet.
Sleep Log (2019-) / Keystoke Activity Log (2013-)
I log which hours I was asleep. I live alone and tend to fall asleep first thing after closing my laptop in bed, or at least with a video playing in the background, which makes this relatively easy. I keep a computer log of whether I’m using my keyboard (I almost never do anything with just the mouse) for each minute using a custom-built keylogger (it records activity but not passwords).
Then I run it through a custom script (included in link) which says which broad periods I was active. The biggest inactive period in a day is when I was asleep.
I was asleep from 4:50am to 12:02pm. I make sure to write down when I wake up into my time log in case I don’t use the computer first thing. This has been much better at guessing when I fell asleep than anything else I’ve tried.
If you don’t fall asleep at a computer, I have some ideas around using a motion sensor (cheap webcams can see in the dark)
Chromium History Log (2013-)
I use Chromium as my only web browser. I export the history and bookmarks every time I do a backup, and put it all in a standard log format (basically time + URL). Currently I only record each history entry once.
For futureproofing, I archive every webpage I go to on an irregular basis (about once a year). Archiving pages doesn’t work super well but it’s better than nothing.
Video/TV Log (2019-)
I watch my movies using noice, either directly on my television, or streamed from my media server to my laptop. When I start watching something, it automatically gets logged (including what the movie is, the path, how long it is etc). Same for when I stop, so I know if I quit early.
Youtube is included in my chromium history (see above). Sadly I’m not sure I can get ‘how much of this video did I watch’ from my format–only that I visited the video.
For futureproofing, I automatically archive every youtube video I watch.
Bash History (2011-)
This one is pretty simple. My Linux shell history (everything I run from the command line, which is basically everything I do outside a browser) is saved, forever. This one goes back to 2011 for my laptops.
Scanning (2014-)
I scan all documents I write, mail I get, etc. and generally throw out the originals. I organize everything by hand, and keep everything as image files.
I use a flat folder structure, which is to say I have a “scans” folder and then a bunch of folders in it like “taxes – 2019”. No nesting. This was my main takeaway from GTD for Hackers and I use flat folders for most digital organization.
I use the Doxie Go feed-through scanner (doesn’t need a computer, writes directly to SD which I love). I recently got a Canon Lide 400 flatbed scanner (works on linux) which I use to scan bound books like my time log.
Who else does this stuff?
As far as I know I came up with this stuff independently. I’ve read plenty of time-management resources (which tend to be good) and experimental journaling resources (which tend to be… scarce?).
Lion Kimbro: “Make a complete map of every thought you think”. General journaling. Inteview.
Fenn Lipowitz (my roommate): Time log, with an emphasis on being completely machine-readable. Being machine-readable means click for pretty graphs. I took inspiration from how machine-parsable this was recently, but I want to keep my freehand sections too.
Bryan Bishop (acquaintance): meetlog, a system for recording conversations and topics of conversation. Overall I didn’t find this useful because I don’t know hundreds of people. The format is so-so, largely because the author can type very fast, including real-time transcripts. I got the inspiration to write topics of conversation while talking from this. I do something similar if I spend a long time thinking or researching, too.
Bullet Journaling: I dunno, if you’re super lost and don’t know how to write a journal/TODO list, some guy figured it out for you! It’s just the basics that you’d figure out on your own, but it may save time. The site is better than the book. I independently invented most of their notation for TODO lists, I don’t find it too useful for a journal. Other peoples’ bullet journal pages are also useful, not just the original author’s.
Most of this should apply for any linux system, other than the driver install step. Also, I believe most of it applies to DeckLink and Intensity cards as well.
Set up hardware. On the Intensity Pro 4K, I see a black screen on my TV when things are set up correctly (a clear rectangle, not just nothing).
From the Blackmagic site, download “Desktop Video SDK” version 10.11.4 (not the latest). Get the matching “Desktop Video” software for Linux.
Install the drivers. In my case, these were in desktopvideo_11.3a7_amd64.deb.
After driver install, lsmod | grep blackmagic should show a driver loaded on debian.
You can check that the PCI card is recognized with lspci | grep Blackmagic (I think this requires the driver but didn’t check)
Update the firmware (optional). sudo BlackmagicFirmwareUpdater status will check for updates available. There were none for me.
Extract the SDK. Move it somewhere easier to type. The relevant folder is Blackmagic DeckLink SDK 10.11.4/Linux/includes. Let’s assume you move that to ~/BM_SDK
Build ffmpeg from source. I’m here copying from my source heavily.
Get the latest ffmpeg source and extract it. Don’t match the debian version–it’s too old to work. wget https://ffmpeg.org/releases/ffmpeg-4.2.tar.bz2 && tar xf ffmpeg-*.tar.bz2 && cd ffmpeg-*
Use ffmpeg. ffmpeg -f decklink -list_devices 1 -i dummy should show your device now. Note the name for below.
ffmpeg -f decklink -list_formats 1 -i 'Intensity Pro 4K' shows supported formats. Here’s what I see for the Intensity Pro 4K:
[decklink @ 0x561bd9881800] Supported formats for 'Intensity Pro 4K':
        format_code     description
        ntsc            720x486 at 30000/1001 fps (interlaced, lower field first)
        pal             720x576 at 25000/1000 fps (interlaced, upper field first)
        23ps            1920x1080 at 24000/1001 fps
        24ps            1920x1080 at 24000/1000 fps
        Hp25            1920x1080 at 25000/1000 fps
        Hp29            1920x1080 at 30000/1001 fps
        Hp30            1920x1080 at 30000/1000 fps
        Hp50            1920x1080 at 50000/1000 fps
        Hp59            1920x1080 at 60000/1001 fps
        Hp60            1920x1080 at 60000/1000 fps
        Hi50            1920x1080 at 25000/1000 fps (interlaced, upper field first)
        Hi59            1920x1080 at 30000/1001 fps (interlaced, upper field first)
        Hi60            1920x1080 at 30000/1000 fps (interlaced, upper field first)
        hp50            1280x720 at 50000/1000 fps
        hp59            1280x720 at 60000/1001 fps
        hp60            1280x720 at 60000/1000 fps
        4k23            3840x2160 at 24000/1001 fps
        4k24            3840x2160 at 24000/1000 fps
        4k25            3840x2160 at 25000/1000 fps
        4k29            3840x2160 at 30000/1001 fps
        4k30            3840x2160 at 30000/1000 fps
Capture some video: ffmpeg -raw_format argb -format_code Hp60 -f decklink -i 'Intensity Pro 4K' test.avi
The format (raw_format and format_code) will vary based on your input settings. In particular, note that-raw_format uyvy422 is the default, which I found did not match my computer output. I was able to switch either the command line or the computer output settings to fix it.
Troubleshooting
I’m not running any capture, but passthrough isn’t working. That’s how the Intensity Pro 4K works. Passthrough is not always-on. I’d recommend a splitter if you want this for streaming.
ffmpeg won’t compile. Your DeckLink SDK may be too new. Get 10.11.4 instead.
I can see a list of formats, but I can’t select one using -format_code. ffmpeg doesn’t recognize the option. Your ffmpeg is too old. Download a newer source.
When I look at the video, I see colored bars. The HDMI output turns on during recording. The Intensity Pro 4K outputs this when the resolution, hertz, or color format does not match the input. This also happens if your SDK and driver versions are mismatched.
My current project is to archive git repos, starting with all of github.com. As you might imagine, size is an issue, so in this post I do some investigation on how to better compress things. It’s currently Oct, 2017, for when you read this years later and your eyes bug out at how tiny the numbers are.
Let’s look at the list of repositories and see what we can figure out.
Github has a very limited naming scheme. These are the valid characters for usernames and repositories: [-._0-9a-zA-Z].
Github has 68.8 million repositories
Their built-in fork detection is not very aggressive–they say they have 50% forks, and I’m guessing that’s too low. I’m unsure what github considers a fork (whether you have to click the “fork” button, or whether they look at git history). To be a little more aggressive, I’m looking at collections of repos with the same name instead.There are 21.3 million different respository names. 16.7 million repositories do not share a name with any other repository. Subtracting, that means there 4.6million repository names representing the other 52.1 million possibly-duplicated repositories.
Here are the most common repository names. It turns out Github is case-insensitive but I didn’t figure this out until later.
hello-world (548039)
test (421772)
datasciencecoursera (191498)
datasharing (185779)
dotfiles (120020)
ProgrammingAssignment2 (112149)
Test (110278)
Spoon-Knife (107525)
blog (80794)
bootstrap (74383)
Hello-World (68179)
learngit (59247)
– (59136)
Here’s the breakdown of how many copies of things there are, assuming things named the same are copies:
1 copy (16663356, 24%)
2 copies (4506958, 6.5%)
3 copies (2351856, 3.4%)
4-9 copies (5794539, 8.4%)
10-99 copies (13389713, 19%)
100-999 copies (13342937, 19%)
1000-9999 copies (7922014, 12%)
10000-99999 copies (3084797, 4.5%)
1000000+ copies (1797060, 2.6%)
That’s about everything I can get from the repo names. Next, I downloaded all repos named dotfiles. My goal is to pick a compression strategy for when I store repos. My strategy will include putting repos with the name name on the same disk, to improve deduplication. I figured ‘dotfiles’ was a usefully large dataset, and it would include interesting overlap–some combination of forks, duplicated files, similar, and dissimilar files. It’s not perfect–for example, it probably has a lot of small files and fewer authors than usual. So I may not get good estimates, but hopefully I’ll get decent compression approaches.
Here’s some information about dotfiles:
102217 repos. The reason this doesn’t match my repo list number is that some repos have been deleted or made private.
243G disk size after cloning (233G apparent). That’s an average of 2.3M per repo–pretty small.
Of these, 1873 are empty repos taking up 60K each (110M total). That’s only 16K apparent size–lots of small or empty files. An empty repo is a good estimate for per-repo overhead. 60K overhead for every repo would be 6GB total.
There are 161870 ‘refs’ objects, or about 1.6 per repo. A ‘ref’ is a branch, basically. Unless a repo is empty, it must have at least one ref (I don’t know if github enforces that you must have a ref called ‘master’).
Git objects are how git stores everything.
‘Blob’ objects represent file content (just content). Rarely, blobs can store content other than files, like GPG signatures.
‘Tree’ objects represent directory listings. These are where filenames and permissions are stored.
‘Commit’ and ‘Tag’ objects are for git commits and tags. Makes sense. I think only annotated tags get stored in the object database.
Internally, git both stores diffs (for example, a 1 line file change is represented as close to 1 line of actual disk storage), and compresses the files and diffs. Below, I list a “virtual” size, representing the size of the uncompressed object, and a “disk” size representing the actual size as used by git.For more information on git internals, I recommend the excellent “Pro Git” (available for free online and as a book), and then if you want compression and bit-packing details the fine internals documentation has some information about objects, deltas, and packfile formats.
Git object counts and sizes:
Blob
41031250 blobs (401 per repo)
taking up 721202919141 virtual bytes = 721GB
239285368549 bytes on disk = 239GB (3.0:1 compression)
Average size per object: 17576 bytes virtual, 5831 bytes on disk
Average size per repo: 7056KB virtual, 2341KB on disk
Tree
28467378 trees (278 per repo)
taking up 16837190691 virtual bytes = 17GB
3335346365 bytes on disk = 3GB (5.0:1 compression)
Average size per object: 591 bytes virtual, 117 bytes on disk
Average size per repo: 160KB virtual, 33KB on disk
Commit
14035853 commits (137 per repo)
taking up 4135686748 virtual bytes = 4GB
2846759517 bytes on disk = 3GB (1.5:1 compression)
Average size per object: 295 bytes virtual, 203 bytes on disk
Average size per repo: 40KB virtual, 28KB on disk
Tag
5428 tags (0.05 per repo)
taking up 1232092 virtual bytes = ~0GB
1004941 bytes on disk = ~0GB (1.2:1 compression)
Average size: 227 bytes virtual, 185 bytes on disk
Average size per repo: 12 bytes virtual, 10 bytes on disk
Ref: ~2 refs, above
Combined
83539909 objects (817 per repo)
taking up 742177028672 virtual bytes = 742GB
245468479372 bytes on disk = 245GB
Average size: 8884 bytes virtual, 2938 bytes on disk
Usage
Blob, 49% of objects, 97% of virtual space, 97% of disk space
Tree, 34% of objects, 2.2% of virtual space, 1.3% of disk space
Commit, 17% of objects, 0.5% of virtual space, 1.2% of disk space
Tags: 0% ish
Even though these numbers may not be representative, let’s use them to get some ballpark figures. If each repo had 600 objects, and there are 68.6 million repos on github, we would expect there to be 56 billion objects on github. At an average of 8,884 bytes per object, that’s 498TB of git objects (164TB on disk). At 40 bytes per hash, it would also also 2.2TB of hashes alone. Also interesting is that files represent 97% of storage–git is doing a good job of being low-overhead. If we pushed things, we could probably fit non-files on a single disk.
Dotfiles are small, so this might be a small estimate. For better data, we’d want to randomly sample repos. Unfortunately, to figure out how deduplication works, we’d want to pull in some more repos. It turns out picking 1000 random repo names gets you 5% of github–so not really feasible.
164TB, huh? Let’s see if there’s some object duplication. Just the unique objects now:
Blob
10930075 blobs (106 per repo, 3.8:1 deduplication)
taking up 359101708549 virtual bytes = 359GB (2.0:1 dedup)
121217926520 bytes on disk = 121GB (3.0:1 compression, 2.0:1 dedup)
Average size per object: 32854 bytes virtual, 11090 bytes on disk
Average size per repo: 3513KB virtual, 1186KB on disk
Tree
10286833 trees (101 per repo, 2.8:1 deduplication)
taking up 6888606565 virtual bytes = 7GB (2.4:1 dedup)
1147147637 bytes on disk = 1GB (6.0:1 compression, 2.9:1 dedup)
Average size per object: 670 bytes virtual, 112 bytes on disk
Average size per repo: 67KB virtual, 11KB on disk
Commit
4605485 commits (45 per repo, 3.0:1 deduplication)
taking up 1298375305 virtual bytes = 1.3GB (3.2:1 dedup)
875615668 bytes on disk = 0.9GB (3.3:1 dedup)
Average size per object: 282 bytes virtual, 190 bytes on disk
Average size per repo: 13KB virtual, 9KB on disk
Tag
2296 tags (0.02 per repo, 2.7:1 dedup)
taking up 582993 virtual bytes = ~0GB (2.1:1 dedup)
482201 bytes on disk = ~0GB (1.2:1 compression, 2.1:1 dedup)
Average size per object: 254 virtual, 210 bytes on disk
Average size per repo: 6 bytes virtual, 5 bytes on disk
Combined
25824689 objects (252 per repo, 3.2:1 dedup)
taking up 367289273412 virtual bytes = 367GB (2.0:1 dedup)
123241172026 bytes of disk = 123GB (3.0:1 compression, 2.0:1 dedup)
Average size per object: 14222 bytes virtual, 4772 bytes on disk
Average size per repo: 3593KB, 1206KB on disk
Usage
Blob, 42% of objects, 97.8% virtual space, 98.4% disk space
Tree, 40% of objects, 1.9% virtual space, 1.0% disk space
Commit, 18% of objects, 0.4% virtual space, 0.3% disk space
Tags: 0% ish
All right, that’s 2:1 disk savings over the existing compression from git. Not bad. In our imaginary world where dotfiles are representative, that’s 82TB of data on github (1.2TB non-file objects and 0.7TB hashes)
Let’s try a few compression strategies and see how they fare:
243GB (233GB apparent). Native git compression only
243GB. Same, with ‘git repack -adk’
237GB. As a ‘.tar’
230GB. As a ‘.tar.gz’
219GB. As a’.tar.xz’ We’re only going to do one round with ‘xz -9’ compression, because it took 3 days to compress on my machine.
124GB. Using shallow checkouts. A shallow checkout is when you only grab the current revision, not the entire git history. This is the only compression we try that loses data.
125GB. Same, with ‘git repack -adk’)
Throwing out everything but the objects allows other fun options, but there aren’t any standard tools and I’m out of time. Maybe next time. Ta for now.
We made a blast furnace, following David Gingery’s The Charcoal Foundry. Here are some pictures of the firing process. We haven’t melted or cast any metal yet.
Slow initial burn to drive out most of the waterBlast furnace in action to completely dry itYou can tell we’re trained professionals by the fan setupBlast furnace meat is best meatRichard looking dubiously at the furnace
I’ve crawled the largest english-language recipes sites, and parsed the results into JSON. Go do fun things with a database of 140,000 recipes!
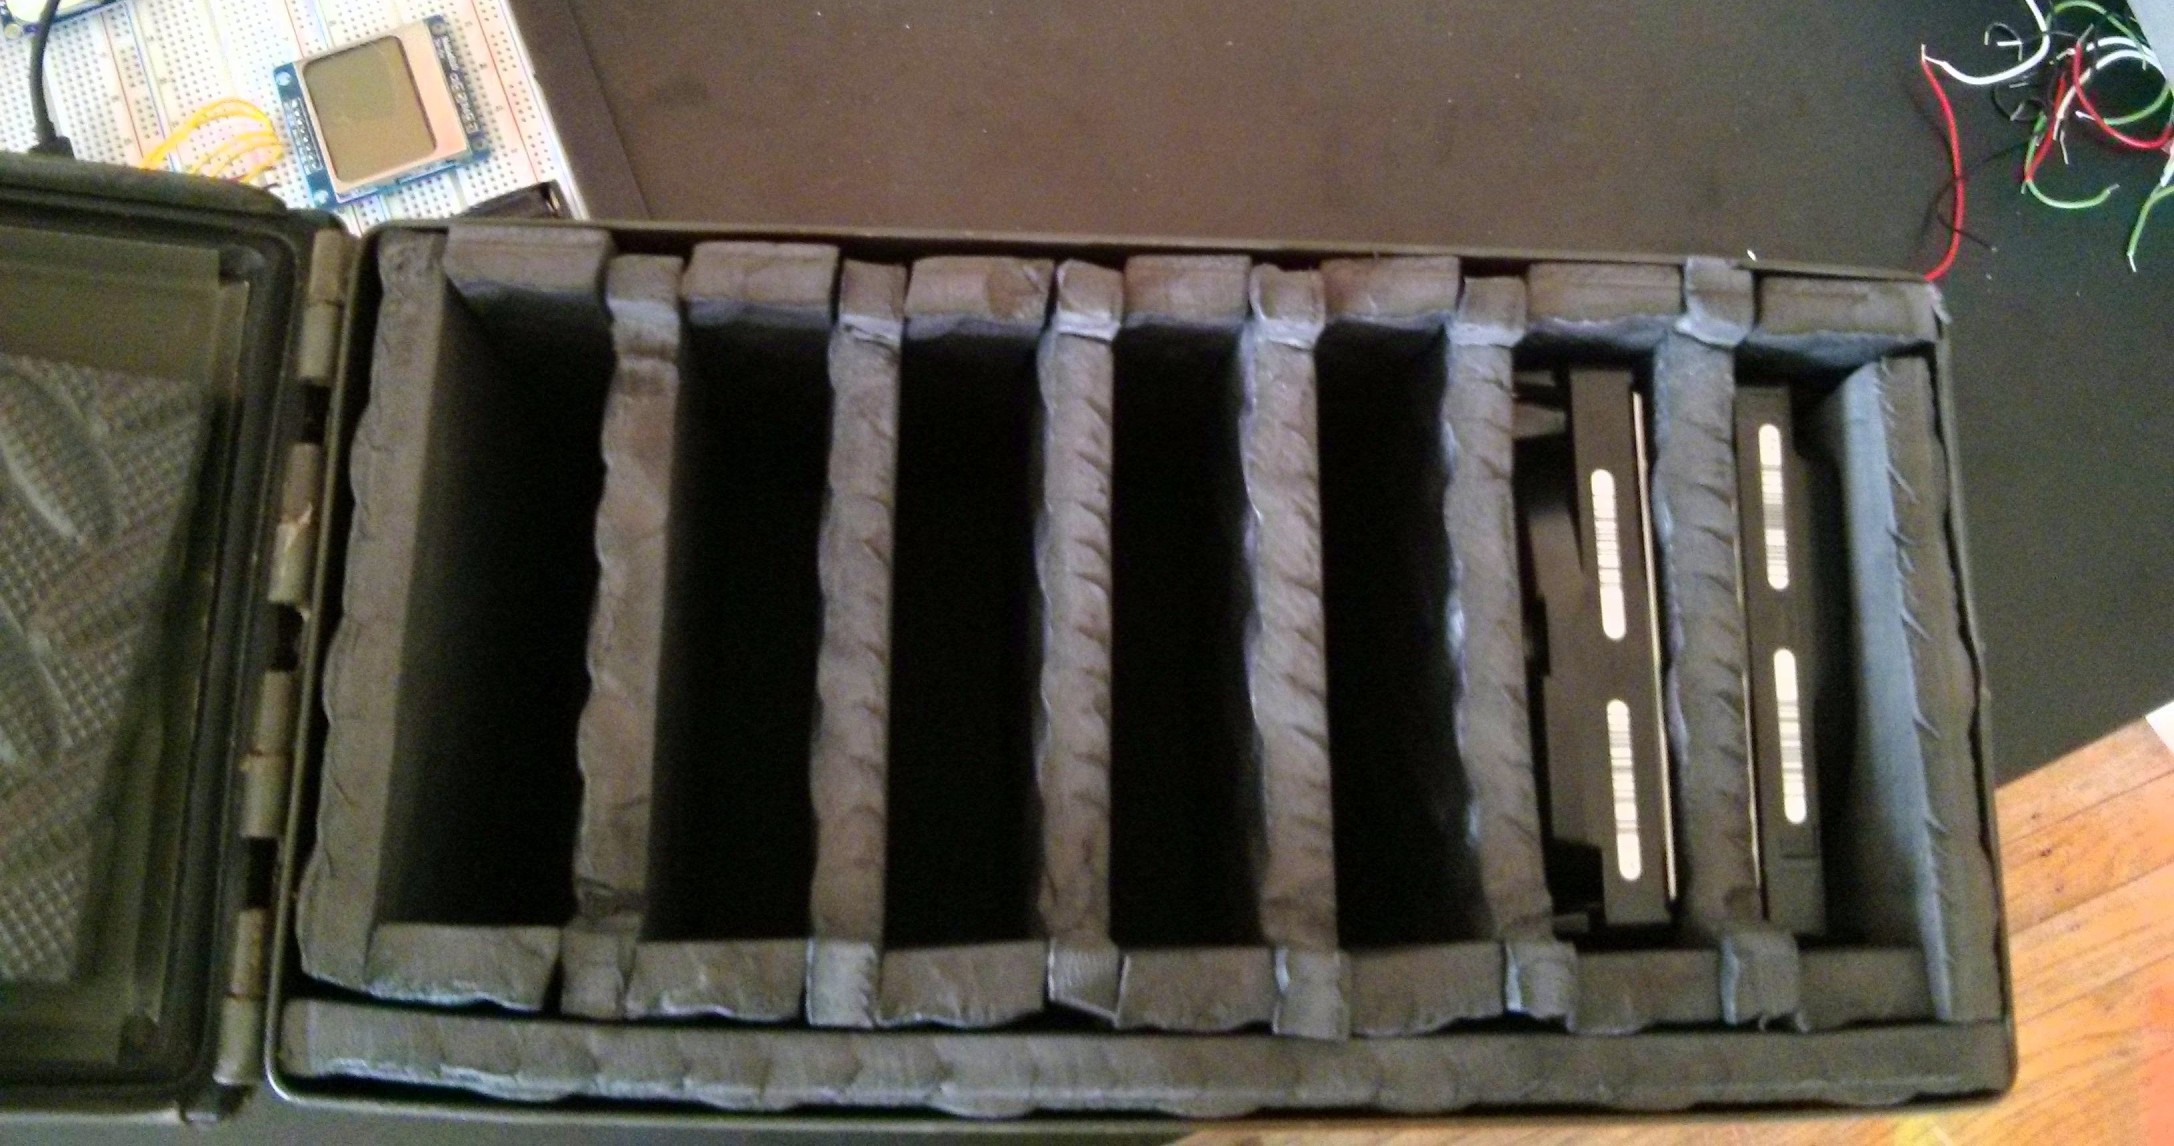
Today’s project was a hard drive carrying case. I wanted something to securely store hard drives. When I looked around on ebay and amazon, I saw some nice cases and some crappy plastic molded ones. Even the terrible ones were at least $50, so I made my own.
I bought a used ammo case at the rather excellent local army surplus store. Then I padded all sides. I had spare EVA foam “puzzle piece” style mats from a gym setup lying around. I cut out the pieces with scissors. That’s it. I was expecting more steps, but nothing needed glued in place. I was planning on adding inserts for the empty slots, but it seems secure enough. If you’re making one, you could also glue the top onto the lid, so you don’t have to take it out manually.
I’m on Linux, and here’s what I did to get the Adafruit Pro Trinket (3.3V version) to work. I think most of this should work for other Adafruit boards as well. I’m on Arch Linux, but other distros will be similar, just find the right paths for everything. Your version of udev may vary on older distros especially.
Install the Arduino IDE. If you want to install the adafruit version, be my guest. It should work out of the box, minus the udev rule below. I have multiple microprocessors I want to support, so this wasn’t an option for me.
Copy the hardware profiles to your Arduino install. pacman -Ql arduino shows me that I should be installing to /usr/share/aduino. You can find the files you need at their source (copy the entire folder) or the same thing is packaged inside of the IDE installs.
cp adafruit-git /usr/share/arduino/adafruit
Re-configure “ATtiny85” to work with avrdude. On arch, pacman -Ql arduino | grep "avrdude.conf says I should edit /usr/share/arduino/hardware/tools/avr/etc/avrdude.conf. Paste this revised “t85” section into avrdude.conf (credit to the author)
Install a udev rule so you can program the Trinket Pro as yourself (and not as root).
Add yourself as an arduino group user so you can program the device with usermod -G arduino -a <username>. Reload the udev rules and log in again to refresh the groups you’re in. Close and re-open the Arduino IDE if you have it open to refresh the hardware rules.
You should be good to go! If you’re having trouble, start by making sure you can see the correct hardware, and that avrdude can recognize and program your device with simple test programs from the command link. The source links have some good specific suggestions.