I finished the text editor I was working on to learn OCaml.
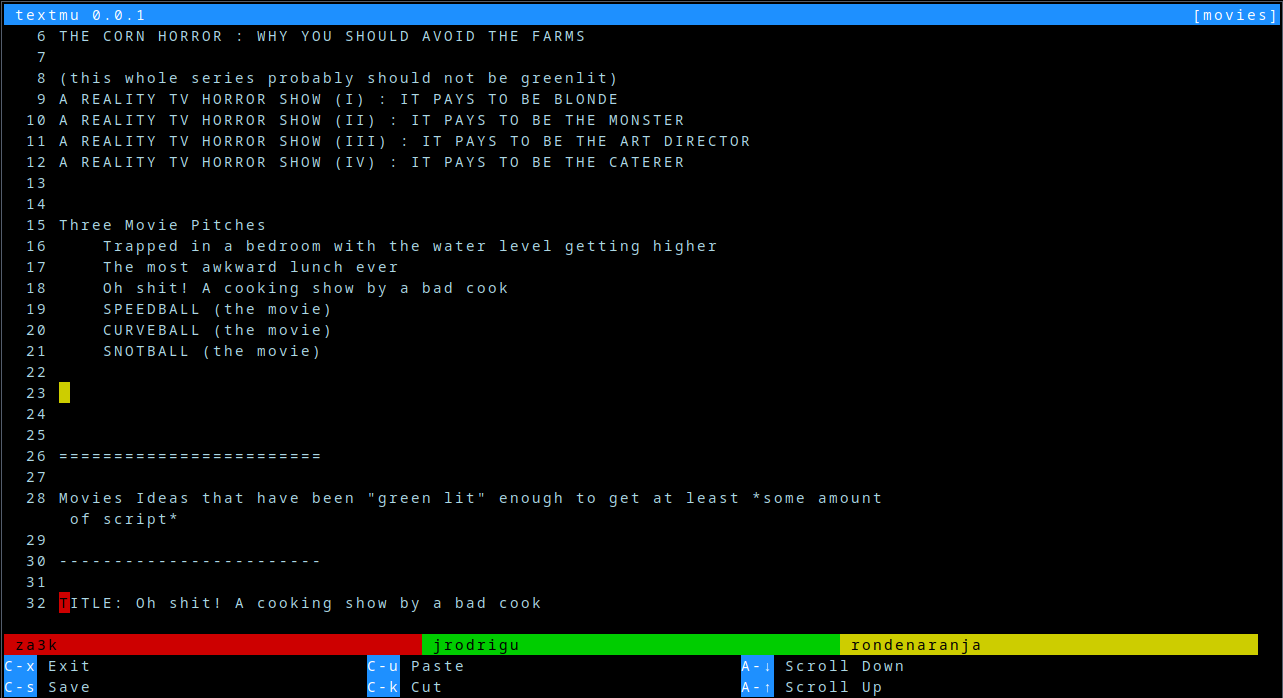
three people editing one document
It's (tentatively) called textmu. The selling point is that it's designed for multiple users, all SSH-ed into the same machine, to edit a document collaboratively. Otherwise, I basically made it a simplified knockoff of nano.
If you'd like to try it out (and don't want to compile it locally), feel free to get an account on my public server, tilde.
Also, an update. The OCaml folks said it's fine to publish their book, so you can now get your own copy if you want one (link goes to updated blog post with photos).
One feature I really liked about older ThinkPad models was that when you plugged in power, it would give a little chirpy beep. Same when you disconnected it.
The downside to system beeping is that it gets really annoying. I don't want a failed tab completion to go "beep" aloud, especially when I'm in public.
I aggressively turn off all kinds of system bells, etc. Sadly, I get no beeps either.
Today I wrote a little python script to monitor power beep how I want. It plays it through my computer speakers (unmuting them if needed, just long enough to beep). It works for me on both ALSA and pulseaudio with an ALSA bridge (I have a few computers on each).
My default settings are:
Two falling tones when power is unplugged
Two rising tones when power is plugged back in
Two warning beeps when the lowest battery reaches 10% (my laptop has two)
Three warning beeps when the lowest battery reaches 5%.
Source code is on github if you want to use it too. To change the thresholds or beeps, you'd have to change the code. No fancy configs, sorry!
I scan each and every piece of paper that passes through my hands. All my old to-do lists, bills people send me in the mail, the manual for my microwave, everything. I have a lot of scans.
scan-organizer is a tool I wrote to help me neatly organize and label everything, and make it searchable. It’s designed for going through a huge backlog by hand over the course of weeks, and then dumping a new set of raw scans in whenever afterwards. I have a specific processing pipeline discussed below. However if you have even a little programming skill, I’ve designed this to be modified to suit your own workflow.
Input and output
The input is some raw scans. They could be handwritten notes, printed computer documents, photos, or whatever.
The final product is that for each file like ticket.jpg, we end up with ticket.txt. This has metadata about the file (tags, category, notes) and a transcription of any text in the image, to make it searchable with grep & co.
---
category: movie tickets
filename: seven psychopaths ticket.jpg
tags:
- cleaned
- categorized
- named
- hand_transcribe
- transcribed
- verified
---
Rialto Cinemas Elmwood
SEVEN PSYCHOPAT
R
Sun Oct 28 1
7:15 PM
Adult $10.50
00504-3102812185308

Rialto Cinemas Gift Cards
Perfect For Movie Lovers!
Here are some screenshots of the process. Apologizies if they’re a little big! I just took actual screenshots.
At any point I can exit the program, and all progress is saved. I have 6000 photos in the backlog–this isn’t going to be a one-session thing for me! Also, everything has keyboard shortcuts, which I prefer.
Phase 1: Rotating and Cropping
First, I clean up the images. Crop them, rotate them if they’re not facing the right way. I can rotate images with keyboard shortcuts, although there are also buttons at the bottom. Once I’m done, I press a button, and scan-organizer advanced to the next un-cleaned photo.
Phase 2: Sorting into folders
Next, I sort things into folders, or “categories”. As I browse folders, I can preview what’s already in that folder.
Phase 3: Renaming Images
Renaming images comes next. For convenience, I can browse existing images in the folder, to help name everything in a standard way.
Phase 4: Tagging images
I tag my images with the type of text. They might be handwritten. Or they might be printed computer documents. You can imagine extending the process with other types of tagging for your use case.
Not yet done: OCR
Printed documents are run through OCR. This isn’t actually done yet, but it will be easy to plug in. I will probably use tesseract.
Phase 5: Transcribing by hand
I write up all my handwritten documents. I have not found any useful handwriting recognition software. I just do it all by hand.
The point of scan-organizer is to filter based on tags. So only images I’ve marked as needing hand transcription are shown in this phase.
Phase 6: Verification
At the end of the whole process, I verify that each image looks good, and is correctly tagged and transcribed.
I just wrote the first pass at youtube-autodl, a tool for automatically downloading youtube videos. It’s inspired by Popcorn Time, a similar program I never ended up using, for automatically pirating the latest video from a TV series coming out.
You explain what you want to download, where you want to download it to, and how to name videoes. youtube-autodl takes care of the rest, including de-duplication and downloading things ones.
The easiest way to understand it is to take a look at the example config file, which is my actual config file.
Personally, I find youtube is pushing “watch this related” video and main-page feeds more and more, to the point where they actually succeed with me. I don’t want to accidentally waste time, so I wanted a way to avoid visiting youtube.com. This is my solution.
qr-backup is a program to back up digital documents to physical paper. Restore is done with a webcam, video camera, or scanner. Someday smart phone cameras will work.
I’ve been making some progress on qr-backup v1.1. So far I’ve added:
--restore, which does a one-step restore for you, instead of needing a bash one-line restore process
--encrypt provides password-based encryption
An automatic restore check that checks the generated PDF. This is mostly useful for me while maintaining qr-backup, but it also provides peace-of-mind to users.
--instructions to give more fine-tuned control over printing instructions. There’s a “plain english” explanation of how qr-backup works that you can attach to the backup.
--note for adding an arbitrary message to every sheet
Base-64 encoding is now per-QR code, each QR is self-contained.
Codes are labeled N01/50 instead of 01/50, to support more code types in the future.
Code cleanup of QR generation process.
Several bugfixes.
v1.1 will be released when I make qr-backup feature complete:
Erasure coding, so you only need 70% of the QRs to do a restore.
Improve webcam restore slightly.
v1.2 will focus on adding a GUI and support for Windows, Mac, and Android. Switching off zbar is a requirement to allow multi-platform support, and will likely improve storage density.
I’m on Linux, and here’s what I did to get the Adafruit Pro Trinket (3.3V version) to work. I think most of this should work for other Adafruit boards as well. I’m on Arch Linux, but other distros will be similar, just find the right paths for everything. Your version of udev may vary on older distros especially.
Install the Arduino IDE. If you want to install the adafruit version, be my guest. It should work out of the box, minus the udev rule below. I have multiple microprocessors I want to support, so this wasn’t an option for me.
Copy the hardware profiles to your Arduino install. pacman -Ql arduino shows me that I should be installing to /usr/share/aduino. You can find the files you need at their source (copy the entire folder) or the same thing is packaged inside of the IDE installs.
cp adafruit-git /usr/share/arduino/adafruit
Re-configure “ATtiny85” to work with avrdude. On arch, pacman -Ql arduino | grep "avrdude.conf says I should edit /usr/share/arduino/hardware/tools/avr/etc/avrdude.conf. Paste this revised “t85” section into avrdude.conf (credit to the author)
Install a udev rule so you can program the Trinket Pro as yourself (and not as root).
Add yourself as an arduino group user so you can program the device with usermod -G arduino -a <username>. Reload the udev rules and log in again to refresh the groups you’re in. Close and re-open the Arduino IDE if you have it open to refresh the hardware rules.
You should be good to go! If you’re having trouble, start by making sure you can see the correct hardware, and that avrdude can recognize and program your device with simple test programs from the command link. The source links have some good specific suggestions.


