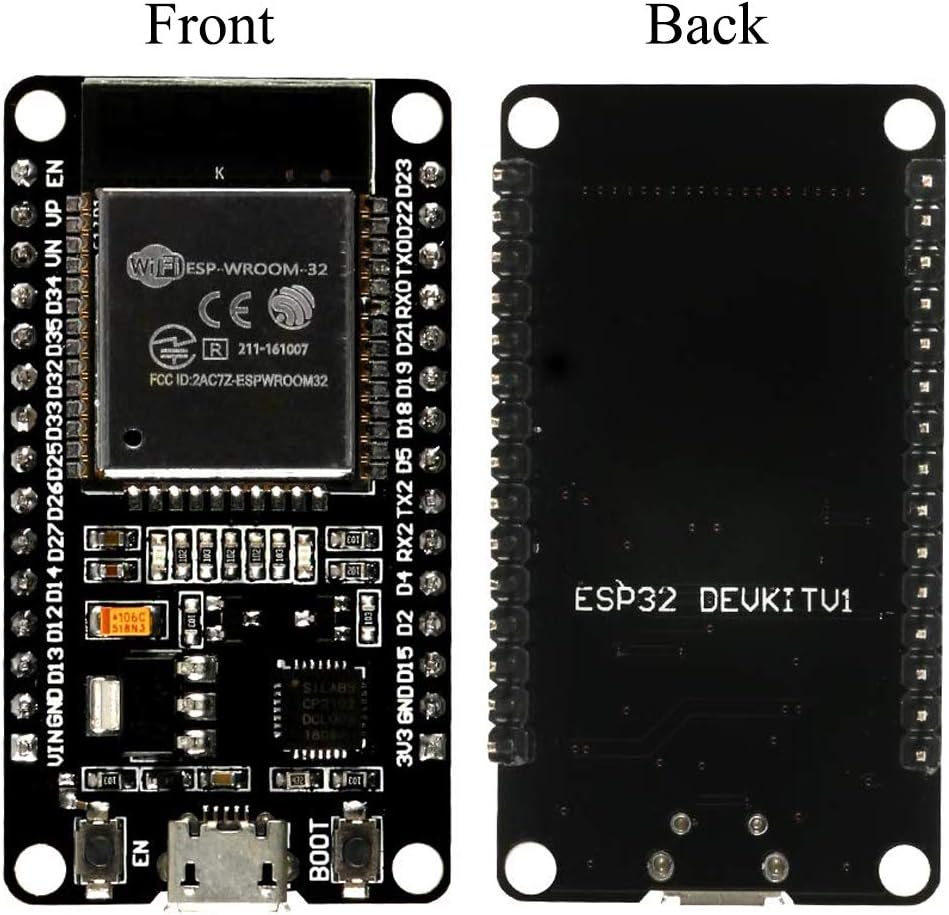
Introducing the Zorchpad (+ display demo)

A friend of mine, Kragen Javier Sitaker has been designing something he calls the zorzpad (see link below). I can never remember the name, so as a joke my version became the “zorch pad”. We live on opposite sides of the globe, but we’ve picked up the same or similar hardware, and have been having fun developing the hardware and software together.

The basic idea of the Zorchpad is to have one computer, indefinitely. It should keep working until you die. That means no battery that runs out, and no parts that go bad (and of course, no requirements to “phone home” for the latest update via wifi!). This is not your standard computer, and we’ve been trying a lot of experimental things. One of the main requirements is that everything be very low-power. He picked out the excellent apollo3 processor, which theoretically runs at around 1mW. In general, the zorchpad is made of closed-source hardware.

Since I’ve realized this will be a long project, I’m going to post it piece-by-piece as I make progress. Below is a demo of the display.

The graphics demo shows, in order:

  • a title screen
  • a flashing screen (to show graphics-mode framerate)
  • a demo of font rendering. we’re using the fixed-width font tamsyn.
  • a munching squares animation
  • a demo of how fast “text-mode” updates would be

We’re using a memory-in-pixel LCD. The only manufacturer is Sharp LCD. You have have seen these before in things like the Pebble watch–they’ve very low-power except when you’re updating. This particular screen is quite tiny–240x400px display (which is fine with me), but only 1.39×2.31 inches (35x59mm). The only bigger screen available in this technology is 67x89mm, a bit lower resolution, and out of stock. As soon as it’s in stock I plan to switch to it.

According to the datasheet, the screen consumes 0.05-0.25mW without an update, and perhaps 0.175-0.35mW updating once per second. We haven’t yet measured the real power consumption for any of the components.

The most obvious alternative is e-ink. E-ink has a muuuch slower refresh rate (maybe 1Hz if you hack it), and uses no power when not updating. Unfortunately it uses orders of magnitude more power for an update. Also, you can get much larger e-ink screens. The final zorchpad might have one, both or something else entirely! We’re in an experimentation phase.

Datasheets, a bill of materials, and all source code can be found in my zorchpad repo. Also check out Kragen’s zorzpad repo.

Getting the Adafruit Pro Trinket 3.3V to work in Arch Linux

I’m on Linux, and here’s what I did to get the Adafruit Pro Trinket (3.3V version) to work. I think most of this should work for other Adafruit boards as well. I’m on Arch Linux, but other distros will be similar, just find the right paths for everything. Your version of udev may vary on older distros especially.

  1. Install the Arduino IDE. If you want to install the adafruit version, be my guest. It should work out of the box, minus the udev rule below. I have multiple microprocessors I want to support, so this wasn’t an option for me.
  2. Copy the hardware profiles to your Arduino install. pacman -Ql arduino shows me that I should be installing to /usr/share/aduino.  You can find the files you need at their source (copy the entire folder) or the same thing is packaged inside of the IDE installs.
    cp adafruit-git /usr/share/arduino/adafruit
  3. Re-configure “ATtiny85” to work with avrdude. On arch, pacman -Ql arduino | grep "avrdude.conf says I should edit /usr/share/arduino/hardware/tools/avr/etc/avrdude.conf. Paste this revised “t85” section into avrdude.conf (credit to the author)
  4. Install a udev rule so you can program the Trinket Pro as yourself (and not as root).
    # /etc/udev/rules.d/adafruit-usbtiny.rules
    SUBSYSTEM=="usb", ATTR{product}=="USBtiny", ATTR{idProduct}=="0c9f", ATTRS{idVendor}=="1781", MODE="0660", GROUP="arduino"
  5. Add yourself as an arduino group user so you can program the device with usermod -G arduino -a <username>. Reload the udev rules and log in again to refresh the groups you’re in. Close and re-open the Arduino IDE if you have it open to refresh the hardware rules.
  6. You should be good to go! If you’re having trouble, start by making sure you can see the correct hardware, and that avrdude can recognize and program your device with simple test programs from the command link. The source links have some good specific suggestions.

Sources:
http://www.bacspc.com/2015/07/28/arch-linux-and-trinket/
http://andijcr.github.io/blog/2014/07/31/notes-on-trinket-on-ubuntu-14.04/