I recently tried to buy a 3-ring binder, and I was annoyed didn't list spacings on paper OR binders. This is my attempt to write a reference for future searchers.
The spacing between rings seems to be standard. The ring size itself isn't standard. Holes vary from 6-8mm. I live in the United States -- different binders may be standard where you live.
Here are the spacings I found. If you encounter a 3-ring binder not listed, or pre-punched paper that doesn't match the below, please email me with the measurements and brand name.
Paper sizes:
US Letter: 215.9x279.4 mm / 8.5x11 inch
A4: 210 x 297 mm / 8-1/4 x 11-3/4 in
A5: 148 x 210 mm / 5-7/8 x 8-1/4 in
A6: 105 x 148 mm / 4-1/8 x 5-7/8 in
Filofax (brand name): 95x170 mm / 3.75x6.7 inch
SMD "sampler" parts sheets (unclear if standardized): 117x175 mm; A6 6-ring spacing
US Letter, 3-ring
These are the "standard" 3-ring binders in the USA.
108mm hole spacing
A5, 3-ring
In Staples, I found these sold as "mini" binders.
70mm hole spacting
A5, 6-ring
19mm hole pitch, 70mm central gap
A6, 6-ring
19mm hole pitch, 40mm central gap
Filofax, 6-ring
19mm hole pitch, 50.8mm central gap
Join me, and learn about how to debug cron jobs, as well as a little about env and strace.
I have a cronjob on my desktop which plays audible reminders for me of various events. For example, my wakeup alarm is:
#minute hour  day of month  month  day of week  user     command
0       10    *             *      *            zachary  chronic notify --here "alarm time. wake up"
Every morning, notify speaks aloud "Alarm time. Wake up.". It speaks on my laptop... and then my laptop again... and finally my desktop. It's not supposed to do the laptop step twice. It should speak two times, not three. It's just one of those small things that niggle at you over time.
In fact, I run on my desktop manually:
chronic notify --here "Alarm time. Wake up"
And... it plays on my laptop... then my desktop. Two times. That's what it's supposed to do. Um, what gives?
I do my usual trick to re-create the (kind of weird) cron environment:
#minute hour  day of month  month  day of week  user     command
*       *     *             *      *            zachary  env > /tmp/cronenv
0       10    *             *      *            zachary  chronic notify --here "alarm time. wake up"
I wait a minute, and read /tmp/cronenv. Yep, looks good.
I turn that back off, and run again, using the cron environment.
env -i $(cat /tmp/cronenv) chronic notify --here "Remember to do review" # 3 times
Okay, that speaks three times. Problem reproduced.
Incidentally, I found something interesting reading the man page to env. As you may or may not be aware, shebang lines at the top of a program execute the script listed there:
#!/bin/python

import os
...
when run as an executable, is the same as calling
/bin/python <path/to/script.py>
And
#!/bin/python -i
(which runs the script, then lets you interactively look at variables) is the same as
/bin/python -i <path/to/script.py>
Incidentally, the /bin/ is optional -- you can just use python. But it's better for security to use full paths.
So far, so good. But what about
#!/bin/python -i -q
Nope. It prints the confusing:
Unknown option: -
usage: python [option] ... [-c cmd | -m mod | file | -] [arg] ...
Try `python -h' for more information.
Why? That's actually the output of python "-i -q" <path/to/script.py>. Why does python print this message? It's trying to parse short-form options (-abcd as -a -b -c -d) and it sees the second short-form option is a space. It's... not the best error message, certainly (#132414).
Going back to our original digression, the point is that shebang lines can contain zero one or arguments to their command-line program, but not more.
env -S is a neat little option that fixes this:
#!/bin/env -S /bin/python -i -q
Huh, you learn something new every day. Anyway, back to that alarm clock. What's going on? Well, let's bisect.
env >normalenv
Give us a long, long list of environment variables. I delete two that I can't figure out how to get to work correctly because of spaces:
env -i $(cat normalenv) chronic notify --here "Remember to do review" # 2 times
env -i $(cat cronenv)   chronic notify --here "Remember to do review" # 3 times
OK! That works. So I have a working case, and a non-working case, and the only different are the two env files. This should be straightforward, if tedious, from here on out.
I delete a few lines... still works. Those lines didn't matter. Delete a few more... works, those lines weren't important. Delete a few more... it breaks now. Guess one of those was important. I'll return to that section later, restore it for now. Delete a few more... those didn't matter.
At the end of the day, only one line mattered. I can reproduce with a one-line environment file.
Yeah, yeah. I have a gross PATH. There are bigger things in life.
OK, so... hmm. What's going on. Am I calling an external program inside of notify? Let's strace it.
strace is a tool which shows all system calls a program makes. I could read my code carefully... or I could just print what it does. I trust the latter more (and if you didn't write the program, it's handy).
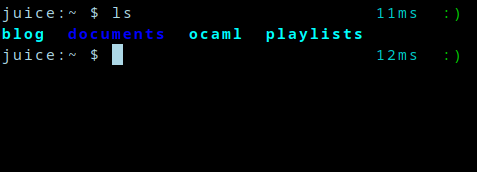
juice:~ $ env -i $(cat normalenv) strace --silence=attach,exit -f -e trace=execve notify --here "Remember to do review" 2>&1 | grep -v SIGCHLD | tee correct.log

execve("/usr/bin/notify", ["notify", "--here", "Remember to do review"], 0x7fff82957da0 /* 1 var */) = 0
[pid 512920] execve("/usr/bin/which", ["which", "sendmail"], 0x616259d51d30 /* 4 vars */) = 0
[pid 512921] execve("/usr/bin/id", ["id", "-u"], 0x616259d53920 /* 4 vars */) = 0

[... many more lines ... ]

[pid 512949] execve("/home/zachary/.opam/default/bin/speak", ["speak", "Remember to do review"], 0x59833be8ac40 /* 6 vars */) = -1 ENOENT (No such file or directory)
[pid 512949] execve("/usr/local/sbin/speak", ["speak", "Remember to do review"], 0x59833be8ac40 /* 6 vars */) = -1 ENOENT (No such file or directory)
[pid 512949] execve("/usr/local/bin/speak", ["speak", "Remember to do review"], 0x59833be8ac40 /* 6 vars */) = -1 ENOENT (No such file or directory)
[pid 512949] execve("/usr/bin/speak", ["speak", "Remember to do review"], 0x59833be8ac40 /* 6 vars */) = 0

juice:~ $ env -i $(cat cronenv) strace --silence=attach,exit -f -e trace=execve notify --here "Remember to do review" 2>&1 | grep -v SIGCHLD >incorrect.log
OK, so we have the correct and incorrect calls. We diff them, and the difference is... everything. Whoops, because we have all kinds of raw pointers and process numbers. Hmm, how do other people do this?
Googling it... it's not a super solved problem. I'll just replace all the numbers by question marks.
for f in correct.log incorrect.log; do
  sed -r -E 's/^(.+)pid [0-9]+(.+)$/\1pid-xxxx\2/;s/0x[0-9a-f]{12}/0x????????????/;s/[0-9]+ vars?/? vars/;' -i $f
done
diff correct.log incorrect.log
And we see something I should have already spotted:
> /usr/bin/notify: line 75: beepz: command not found
If I had just run the program outside of chronic, I would have seen this output already. Oops. Hindsight is 20-20.
Aha. So beepz is not in the cron path.
juice:~ $ env -i $(cat cronenv) beepz
env: ‘beepz’: No such file or directory
We'll add it to the path. Done. Uh oh, beepz still doesn't work. What else do we need? I pull the environment bisecting trick again, and add to cron:
And a quick test confirms I get one wakeup alarm per computer now, just as I like it.
As a last step, why did it break? Well, I know the answer to that one. I used to install all the programs from ~/.projects/short-programs to /bin. But when I was working on developing the programs, the two would get out of sync, so I deleted the system versions. Guess it broke something. Oops.
I am offering two bounties to improve qr-backup. I think both are worth doing regardless.
My rewards are time-in-trade. You can use 5 or 10 hours of my time however you like. I usually charge over $100/hr, so this is a good deal.
If the github bugs are open, the bounties are unclaimed. I will try to update this post when they are claimed, too.
Bounty 1: Improve QR code scanning on Linux
Chances are, there is exactly one command-line program your distro has available to scan QR codes: zbar
Even on digitally-generated images, which are perfectly correct, pixel-aligned, and generally perfect, it still fails to read the codes sometimes. At least one-third of the bugs in the issue tracker are about this problem.
The bounty is to fix this issue in zbar, getting it to read QR codes with a 0% failure rate. The current failure rate is at least 0.1%.
Bounty 2: Code a one-page short C program to restore qr-backup backups
qr-backup is designed to save to paper, and restore from the command-line.
but, it's possible that someday we might lose all the nice infrastructure we have today.
you want to restore your backup, but you're poor and don't have an internet connection
no one runs "unix" any more. we just have neural meshes
it's been 50 years and you can't figure out how to install all these programs no one has heard of like "zbar" and "qr-backup"
your country has become a totalitarian state, and you can't be seen downloading "archiving" programs.
you are a lizard-person who has recovered piles of paper from a previous civilization. what secrets could they hold?
who knows! wouldn't it be great if you could still restore?
this feature request is to add a printable, 1-page short C program which you can type in by hand, compile, and use to restore backups from an image.
This is a very difficult technical challenge in minimization. You should provide a 1-page (2KB) short version of qr-backup's restore process, written in C. Library use is not allowed. Arguments will be accepted for other short programs if 2KB is impossible.
qr-backup actually prints a bash one-liner to do the restore, if you prefer to reference that.
Each of the steps is done by qr-backup in the most standard way possible. Decompression calls zcat, for example. You should be able to re-use existing code easily, the challenge is just to shrink it.
The reward is 5 hours of my time and everlasting fame.
The Zorchpad is a low-power computer I'm working on. Standard keyboards unforunately need too much power, so I'm making my own.
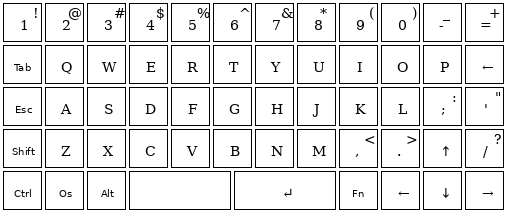
The keyboard layout I'm using has ~60 keys in a 12x5 grid.
12x5 ortholinear layout
The standard way to wire a keyboard is to use a set of wires -- one for each row, one for each column. That's 12 + 5 wires = 17 wires. By driving one of 12 outputs low for a column, and checking each of 5 inputs, we can see which (if any) of the 5 keys in the column are being pressed. We then rapidly switch which of the 12 outputs is low, much faster than human speed, to see which of the 60 keys is pressed.
We'd like to support n-key-rollover, a term which means we can detect any number of keys being pressed at the same time. We don't really need lots of letter keys pressed at once, but this lets us not treat keys like Shift or Control specially. It doesn't cost much, and makes the hardware and software simpler.
Wiring things up the simplest way results in ghosting, a problem where if you press several keys at once, others can erroneously appear pressed as well. Installing a diode on each key solves the issue. Easy-peasy.
But we have a problem. My microcontroller doesn't have 17 free pins. So my plan is to instead use shift registers.
A serial-in, parallel-out shift register lets you send 8 bits, one at a time, and then a special pulse (the "latch"). This sets 8 different output channels.
A parallel-in, serial-out An input shift register lets you do the reverse--you set a "clock" pin to read from 8 input channels to an internal buffer, then read one of the stored bits at a time.
Using 1 SIPO and 1 PISO gives us 8 pins out and 8 pins in. It takes 3 pins per shift register. Some can be shared, so the total might be less than 6, but we have 6 free pins.
We need 12 outputs, not 8. How do we deal with that? One valid approach is to use 2 SIPO (or 2 PISO) shift registers. But I noticed that we only have 60 keys on the keyboard -- in theory 8 inputs x 8 outputs should be plenty. And in fact, we can rearrange things.
What if we take a 8x8 layout, which we know we can wire, and slice it up?
(Thanks for splud of #electronics for this specific arrangement.)
Looks great. All I need to do is hand-wire that layout onto a keyboard.
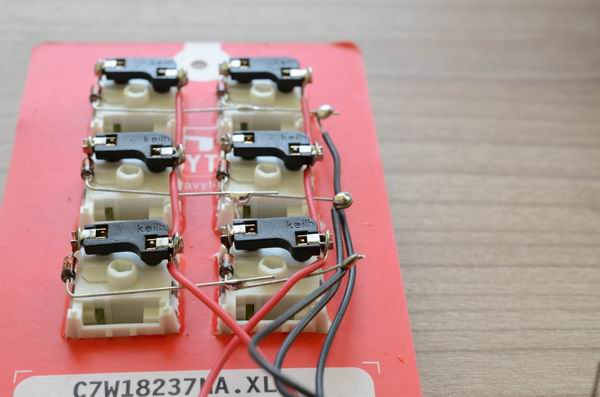
a keypad someone else hand-wired
Okay... that looks hard. I really don't want to do the whole thing and realize I wired it wrong. Let's actually write out an entire schematic to make sure I do the right thing. We have a lot of complicated wiring and diode directions and so on.
logical 8x8 layoutphysical 12x5 layout
All right, I'm ready to assemble and solder. Wish me luck!
I like to keep my home directory pretty small ideally. Just what I'm currently working on, plus maybe one or two permanent directories like docs or the like.
But, it accumulates! Just like a real desk, it gets covered in junk and needs cleaned off.
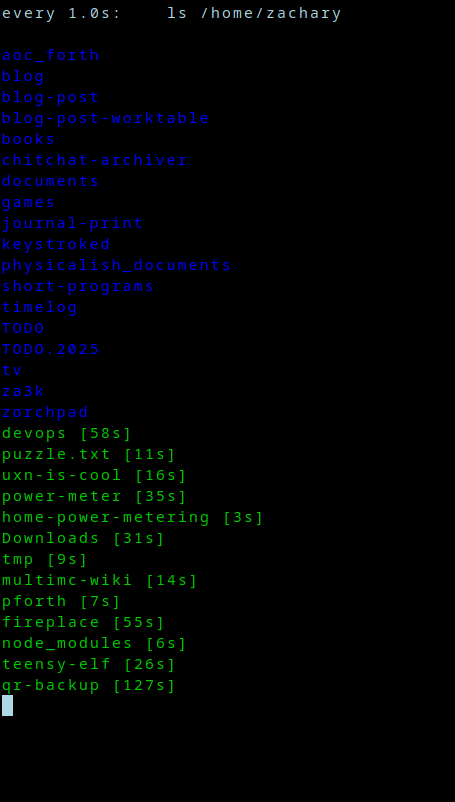
hitlist (source] is a small program I wrote today to make the process of cleaning it up more fun.
cleaning up my home directory
It functions similarly to the classic unix command watch. The idea is that you have a list of problems, and cross them off one by one.
Cleaning up your home directory by running hitlist -- ls ~
Complete your daily todo list with hitlist -- grep '[ ]' ~/documents/TODO.txt
Fix a list of compilation errors with... okay, I haven't figured this one out yet. But it seems doable!
Unlike a real list, it "crosses off" problems for you, once they disappear from the command output, and lists how long you took to solve each one.
You could use this as a race. Or you could do some analysis after one run, and decide "actually, this took too long to fix--next time I'll give up on a bug if it takes more than 5 minutes to solve."
On-screen output is optionally saved to a file on exit.
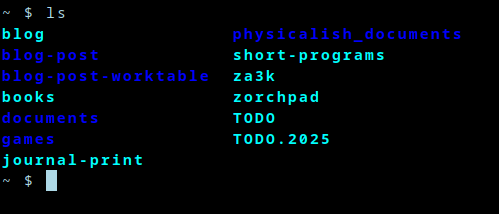
cleaned up laptop homedir desktop is even smaller
Every year, there is a puzzle contest on April 1. You can play over on IRC on #ircpuzzles. Instructions here. The contest is already well underway, sorry for the late notice!
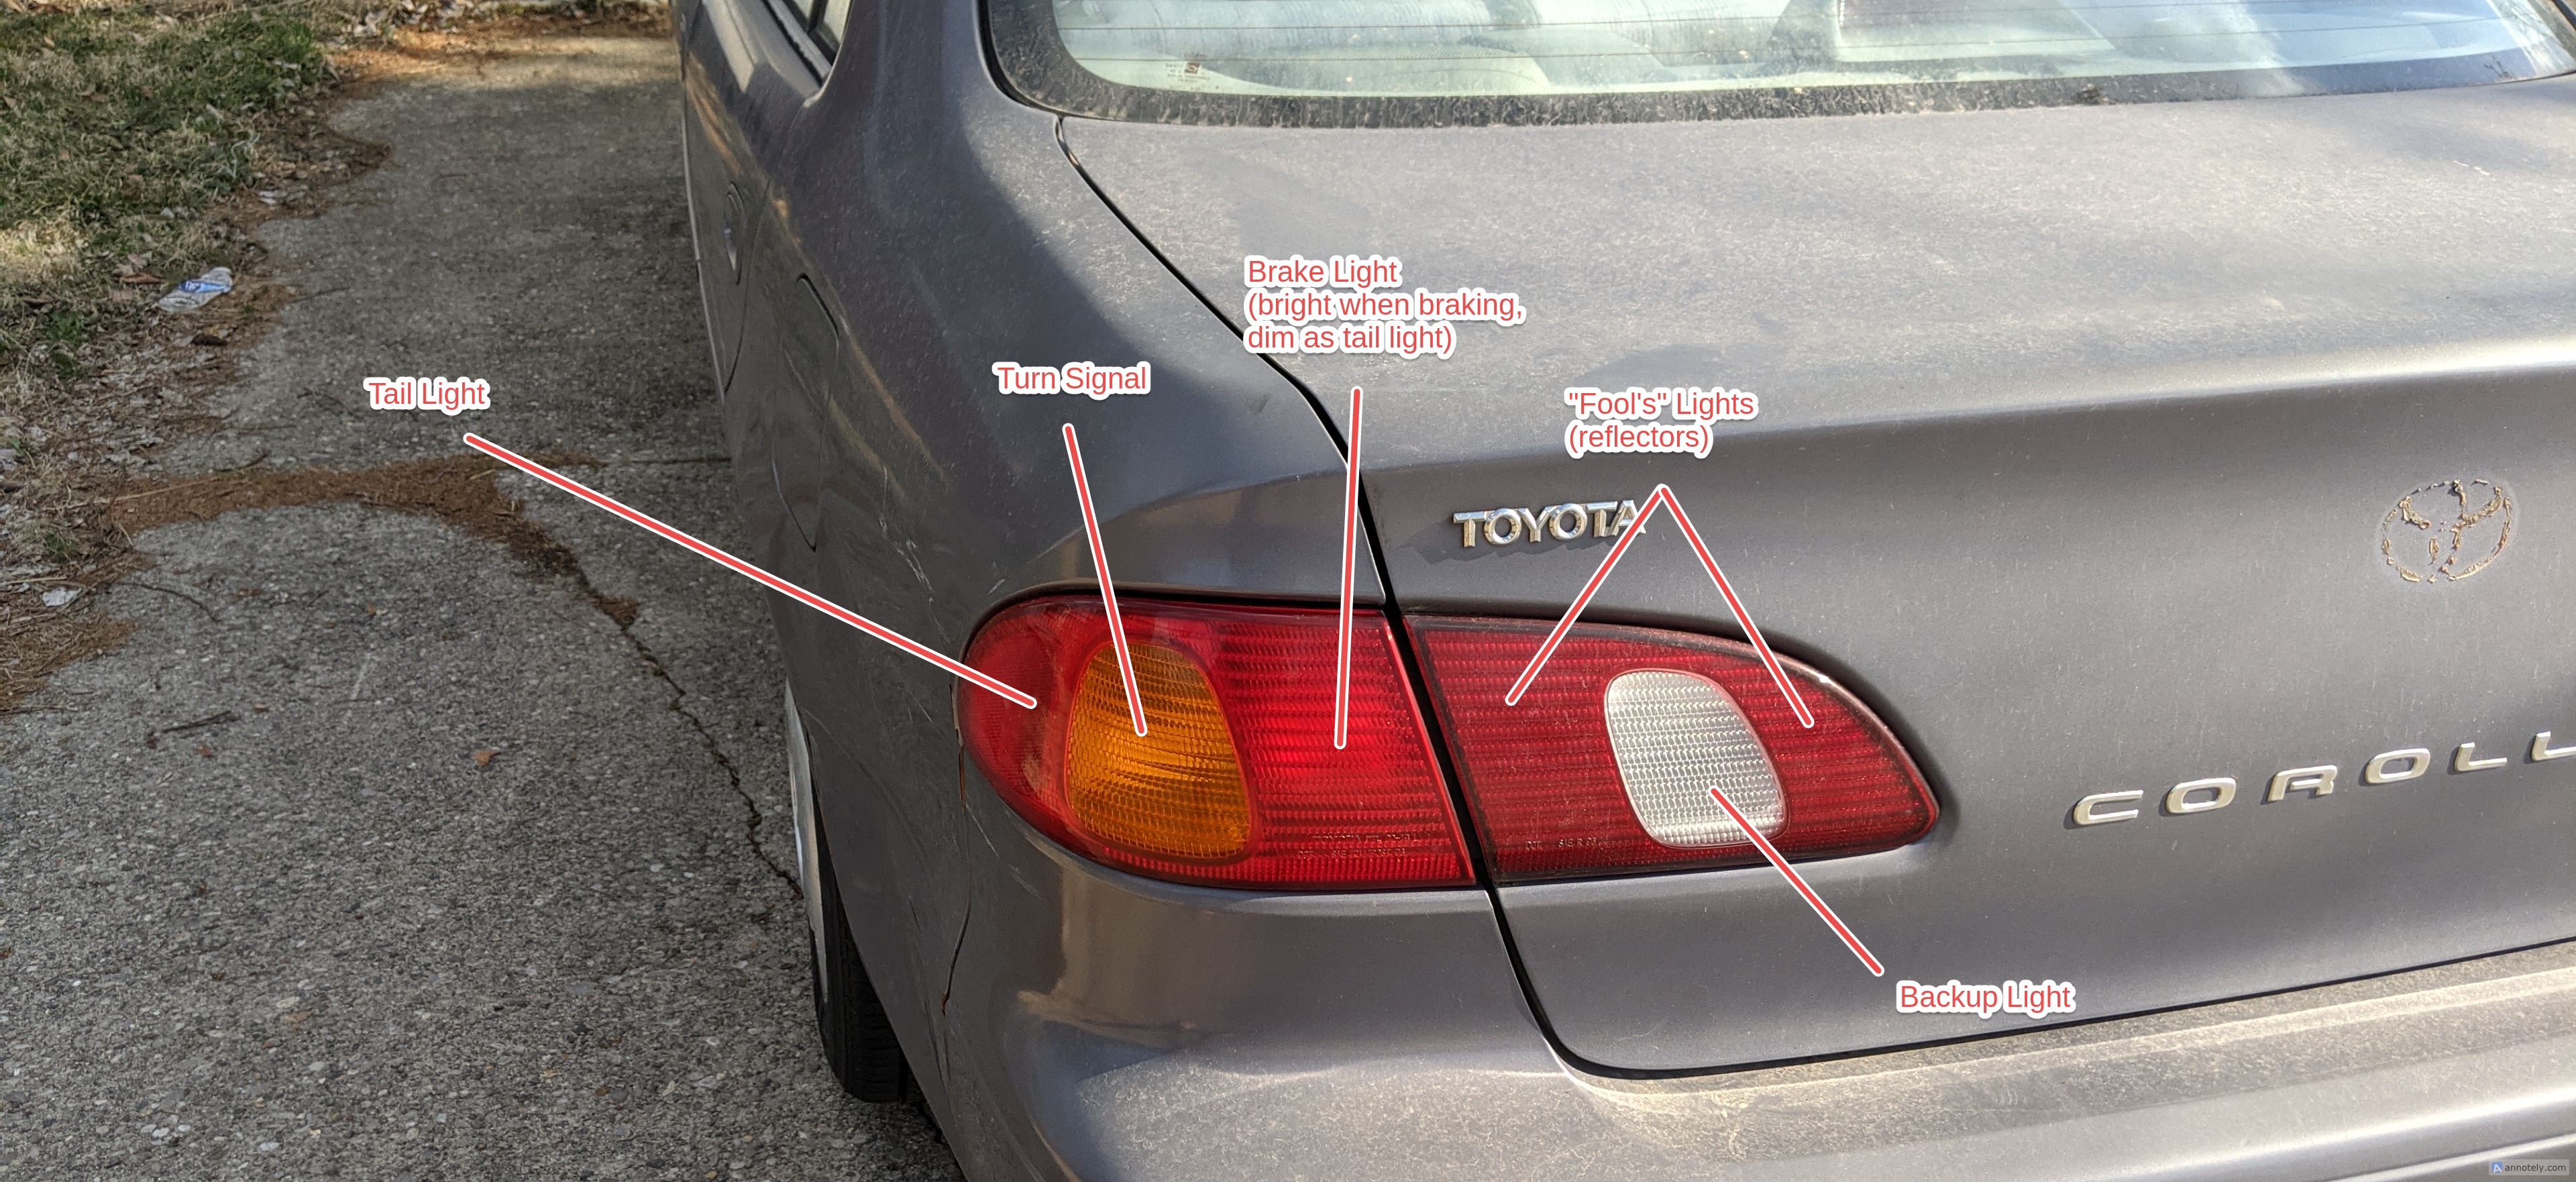
I drive a 1998 Toyota Corolla. For reference, here is a guide to the rear lights.
text added with annotately.com
Note that the brake light also serves as a tail light, which makes it easy to tell if it's out even solo.
To test the backup/reverse light, you need to put the car in reverse (but can keep the brake down). This needs a second person.
All the rear lights are easy and cheap to replace. (The front lights, only cheap.)
It's me, and I'm back working on the Zorchpad. This is the brainchild of one Kragen. We have somewhat different, but related ideas for where to take the project. The idea is to make a computer that will continue to work as long as the human using it.
It's been a while (9 months) since I've posted about the Zorchpad. Basically, I developed an ugh field* around the case. I had been designing it in CAD and trying to print 3D versions of it, for approaching 2 or 3 months, and I just got sick of it. I kept getting stuck, and delayed, and etc. The problem was that I was just emotionally burnt out on the whole subject, and unwilling to look at the case, let alone try to make it yet again. (Even though there are probably some pretty easy ways to do it, like cardboard or clay.)
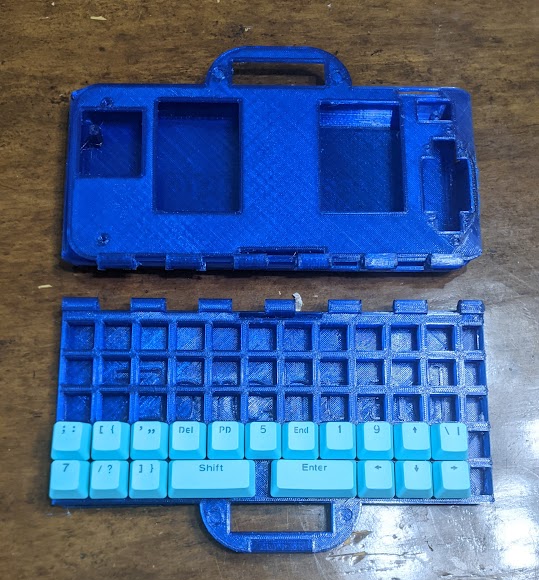
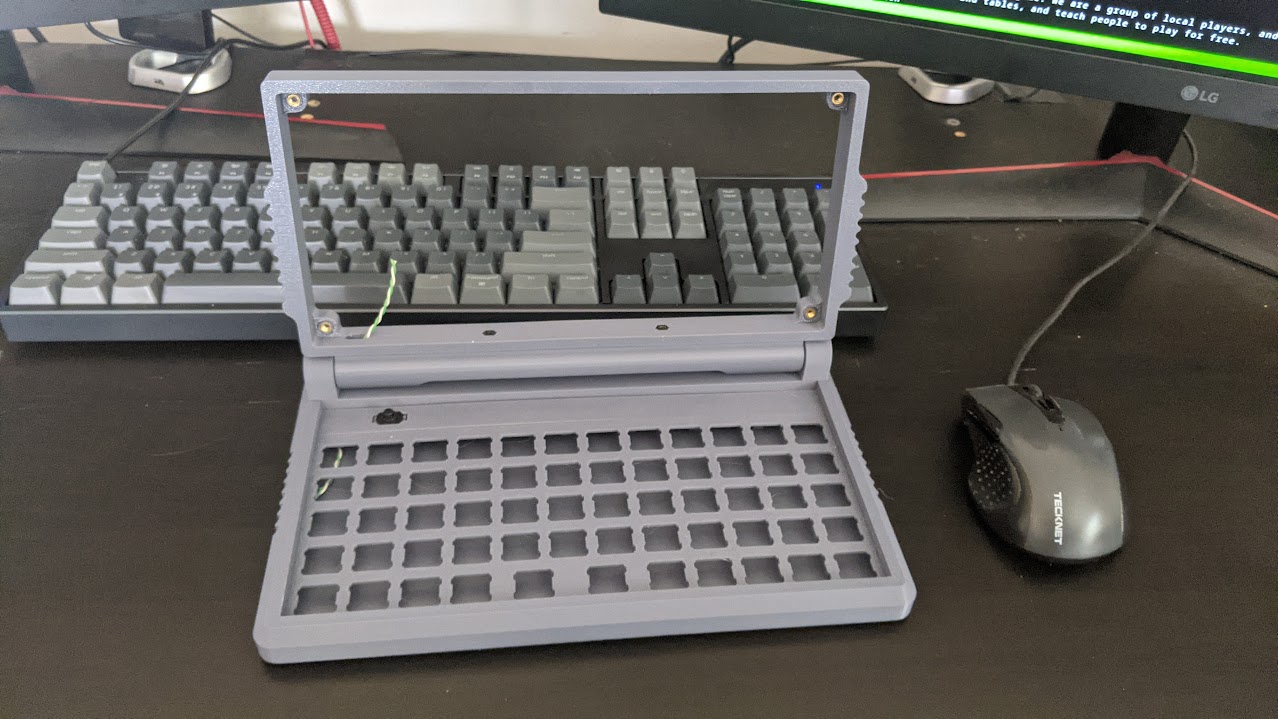
Adam Simonyi to the rescue! I sat down with Adam and woefully begged him to take care of the case for me. And he did!
this case took me 2 months this case took him 2 days. top half designed but not printed
Blame any aesthetic shortcomings on me -- I pushed him pretty hard on "we're just testing electronics! It should look like shit!
Now I am feeling much better and mostly unstuck. I'm ready to start work on the pad again. <3 Thanks Adam!
Even though no big milestones have been accomplished recently, this seems like a good time to summarize the state of the project.
tl;dr: The power budget is 1 milli-watt. As a bit of context, Kragen's approach to making a computer that lasts a long time is to avoid parts that fail. In his experience (he walks around with pocket computers a lot), this seems to include dead batteries. They're out of charge, or need replaced, or there's no power outlet, or he forgot his charger. So his design does not include a battery. Instead, the whole thing is designed to run on solar cells indoors, and hide any power failures from the user. Think an old-school pocket calculator. So, because we want to run on indoor solar, we have a REALLY small power budget (1 milli-watt). Personally, I think even if you have to run on battery, low power use will still be cool.
This heavily influences our hardware choices. We're experimenting and seeing how it works in practice!
Okay, on to the prototype. Where is it at? Get ready for a dump of how my brain works.
v0.1 Roadmap
CPU:
Priority: (Done)
Design notes: Apollo3 system-on-a-chip (on an Adafruit breakout board)
Hardware State: Working.
Software State: Working.
Power: Not tested.
Keyboard:
Priority: Blocking
Design notes: We need a low-power keyboard. I'm making a "matrix" keyboard (zero power usage, needs outside electronics). You can buy these premade up to numpad size.
Hardware State: Not working. I have a 12x5 plate to put keyswitches into, I have switches, and I have keycaps. I should be able to assemble the hardware. Then I will hand-solder them, following instructions from the custom mechanical keyboard community.
Software State: Partially working. Tested with 4x4 keyboard.
Power: Not tested.
Next step: 3D Print
Video (Screen):
Priority: (Done)
Design notes: We need a low-power screen. We selected the SHARP memory-in-pixel display.
Hardware State: Working.
Software State: Working.
Power: Not tested.
Next step blocker: Power measurement
Audio Out:
Priority: (Done for v0.1)
Design notes: Audio is low-power enough that we can do it for headphones. We are adding an audio jack. This also has the advantage that earbuds are easier to replace than speakers.
Hardware State: Working.
Software State: Beeps only (with PWM)
Power: Not tested.
Next step blocker: Power measurement
Persistent Storage:
Priority: High
Hardware State: Working (built-in to apollo3)
Software State: Working.
Power: Not tested.
Next step blocker: Power measurement
Power Switch:
Priority: Blocking
Hardware State: Trivial
Next step: Do it
Wire reduction:
Priority: Blocking
Design notes: A 12x5 matrix keyboard needs not (12+5) wires, but 9 wires. Combined with all the other peripherals, that's too many, so we need something like a shift register to reduce the wire count.
Hardware State: Not working. Have not found a low-power shift register or alternative.
Software State: (Blocked on hardware)
Next step: Order parts OR Do it with high-power shifter for v0.1
Wiring, General:
Priority: Blocking
Hardware State: Not working. (Plan is jumpers or connectors, with wire ends soldered to boards)
Next step: Draw wiring diagram, Order parts
Power Supply:
Priority: Blocking
Design notes: The first version will probably just be a AA battery (not solar)
Hardware State: Not working
Next step: Order parts (AA holder), Check required voltages for all parts, Design schematic
v0.2 Roadmap
E-ink Screen:
Priority: Mid
Design notes: I'm testing adding an e-ink display as well, because the memory-in-pixel display goes up to around 3-4 inches diagonal only.
Hardware State: Not spec'ed. I have two around the house.
Software State: Large screen working on RPi but not apollo3, small screen not working.
Power: Probably uses too much power. Looking around for different screens that use less.
Next step: Research
PC Communicator:
Priority: High.
Design notes: How do we talk to the apollo3 from a normal computer? With the larger apollo3 breakout board, we get a UBS programmer, which solves this for early versions. But we can't measure power usage with USB plugged in, it uses some GPIO pins, and it won't work for the final prototypes with the small breakout board. The main goal is to reprogram the software, not to "talk" and send internet traffic.
Power: Not tested (could be net power gain!)
Next step blocker: GPIO pins
Audio In:
Priority: Very Low
Design notes: (none)
Hardware State: The apollo3 may have an integrated microphone, I wasn't clear.
Software State: Not working.
Power: Not tested.
Next step: Research
Hard Disk:
Priority: Low
Design notes: First version will use a microsd.
Hardware: Not working. If we want a slot (as opposed to soldering to the pads), also not ordered.
Software: Not working.
Power: Not tested.
Next step: Buy parts
Audio Out:
Priority: Mid
Design notes: Improve to support voices
Hardware State: ?
Software State: No voice/music yet. Unclear whether that will need a hardware upgrade.
Power: Not tested.
Next step: Programming, Testing
GPIO:
Priority: Mid
Design notes: To let us hook up new peripherals and/or talk to a computer
Hardware State: Not working
Software State: Not working
Next step blocker: Wire reduction
Power supply v2: Capacitor buffer:
Priority: Low
Design notes: The actual power source is solar power or a battery. We want a buffer so that when the power dies, we have enough time to hibernate.
Next step: Ask for help
Power supply v3: Solar power:
Priority: Low
Design notes: Testing solar panels is high priority to make sure they can supply the right amounts of power, but not actually using them.
Next step: Buy panels, Test panels
Power Use Measurement:
Priority: Mid
Next step: Ask for help (in progress)
Battery Level Measurement:
Priority: Mid
Design notes: Monitor the current battery %/runtime, capacitor %/runtime. Optional: trigger an alert when the battery/solar panel is removed, so we can know to hibernate.
Next step: Ask for help
Clock:
Priority: Very Low
Design notes: Is this needed for power monitors? If so becomes a high priority.
Next step: Research
Connectors + Sockets:
Priority: Low
Design notes: I'd like to learn how to make sockets. This enables to use better connectors than jumper wires, slot in more expensive chips like the apollo3 to re-use them across builds, and use displays with flex ribbon cables. It also allows end-user servicability.
Next step: Requirements, Research, Order parts
Circuitboarding:
Priority: Low
Design notes: We're wiring together a bunch of floating parts with hot glue and jumper wires. Switch to having circuitboards instead at some point. Could be perfboard or traditional printed circuits. Printed circuits could be done with a service or at home.
Next step: Design in KiCAD, Print
Next step blocker: Connectors + Sockets
Persistence on Power Loss:
Design notes: We're planning to run on solar (maybe also battery). If it's dark, you shouldn't lose state. We should just "pause" until the light comes back.
Hardware notes: Blocked
Software notes: Difficult. This is an OS-level software problem.
Next step blockers: Capacitor buffer, Battery level measurement
OS / VM:
Design notes: We want an OS that stops badly-written software from locking up your machine in unfixable ways.
Software notes: Not designed
Next step: Write software
Software:
Design notes: We need some test software! Text editor, text reader, software editor/compiler.
Software notes: Not written
Next step: Write software
I recently read "The Go Programming Language" by Alan A. A. Donovan and Brian W. Kernighan. (I like to imagine Mr. Donovan's full name is Alan Alan Alan Donovan--please don't correct me.) So far I have read the book cover to cover, but not programmed any significant Go.
While reading, I wrote myself a list of questions to look up after I finished. Here are the questions (together with answers).
Q20: Go came out in 2012 with version 1.0. The book was published in 2016 and uses Go 1.5. As of writing it is 2025, and the latest version is 1.24. What has changed in Go since the book came out and now? (Note: Language changes only, no library or tooling changes mentioned)
1.6 (2016) - No changes
1.7 - No changes*
1.8 (2017) - No changes*
1.9
Introduced type aliases
1.10 (2018) - No changes*
1.11 - No changes
1.12 (2019) - No changes
1.13
New number literal syntax.
Shift count can be signed now.
1.14 (2020)
Allow overlapping methods for embedded interfaces (solves the diamond problem for interfaces)
1.15 - None
1.16 (2021) - No changes
1.17
Allows conversion from slice to fixed-size array pointer (can panic)
1.18 (2022)
Generics--type parameters can be used in type definitions as well as function definitions.
Added type any as a shorter name for interface{}
Added type comparable: == works
Added union types: A or B or C
Added type ~T : ~int is any type whose underlying type is int
1.19 - None*
1.20 (2023)
Allow conversion from slice to fixed-size array.
Broading of 'comparable' to include interfaces that might panic at runtime.
1.21
New built-ins (min, max)
New built-in (clear) -- applies or slice or map
Type inference improvements which went a bit over my head.
Fixed an edge case around panic(nil).
1.22 (2024)
Fixes the loop iteration gotcha caused by lexical scoping inside loops. (Previously, there was one loop index which was updated -- now a new variable is created and assigned each loop).
For loops can range over integers.
1.23
Added iterator ranges (iterations are functions).
1.24 (2025)
Type aliases can be parameterized.
Q1: If you try to take the address &map, the compiler prevents you, because the address of a map is its backing store, which can silently change. How is this done? Can I do it for my own types?
Note: You can take the address of &map, just not &map[2].
"It just does that". Map is a built-in type, not an implementation, so it just does stuff you can't. No you can't do it for your own types. There are garbage collection reasons they made it work this way but they're not interesting.
Q2: Can you take the address of a slice? Can the same problem happen?
You can take the address of both &slice and &slice[2].
If append(slice, 599) re-allocates the backing store, the second points to the original backing store, and prevents it from being garbage collected. Also, any changes to it are not affected in the slice returned by append, so you probably shouldn't.
Q3: What are all the forms of for loops?
for INITIALIZER; CONDITION; POST {} - C for loop
for {} - Loop forever
for CONDITION - C while loop
for index, value := range THING {} or for index := range THING {} or for range THING {}. Range can iterate over:
array/slice (index, value)
string (index, value) - this is unicode code points ("runes") and not bytes
map (key, value) - this is in random order
channel (e, N/A) - received elements of a channel
Since 1.22: int (index, N/A) - from 0 to N-1
Since 1.23: function (T1, T2) - function is called with a "loop body" function, which can be called once with each value, and returns whether to keep iterating
Note that break and continue affect loops
Q4: What are the signatures of range, if it's a function?
No, it's a keyword (p27, for Go 1.4 see also p141 gotchas). See Q3 for all the range variants, and Q18 for general function overloading.
Q5: Why does Go say -0 is not equal to 0 in the following code?
var z float64
fmt.Println(-z) // Prints -0
IEEE 754 defines a negative zero. Positive and negative compare equal, so code will generally work as you expect. Go chooses to print "-0" rather than "0" for this value in format strings, while other languages print "0" for both.
Additional discoveries:
int(-z) is 0
the constant -0.0 is positive zero (!)
Q6: (p98) Why does ReadRune() in invalid unicode return a replacement char with length 1 ? The replacement char has byte length 2. Is this a deliberate signal value?
Yes (no citation)
Q7: What happens if you convert Inf, -Inf, NaN, or a float too large to fit into an int, to an int? Book claims conversions don't panic.
All of them are converted to
uint/uint64: 2^63 = 9223372036854775808
int/int64: -2^63 = -9223372036854775808 (even +Inf and 1e200)
Reflect does not support it (and so neither does json.Marshal, etc). I couldn't immediately come up with a way even to distinguish closures and non-closures, or get the name of a function. You can get a function pointer and then do some heuristics to get the name, maybe.
Q9.1: How do map literals work for non-strings?
map[Point]string{Point{0, 0}: "orig"}
    or
map[Point]string{{0, 0}: "orig"} // Names can be left out of keys or values in map literals
Q9.2: Can I make user types with this mechanism? (ex. my own literal initialization)
No. Literals are only for built-in types, and the mechanism is not extensible. (But you can have the underlying type be a map an initialize your type with one.)
Q10: Struct fields can have metadata ("struct tags"). Can whole types?
No.
Q11: How does ... variadic notation fail if the slice can be too short to fill all arguments? Is it only allowed for the variadic argument or can it span multiple?
Yeah, you have to match it with the variadic argument.
Q12: Thomson, Pike, Kernighan, Richie -- fill in a Venn Diagram of what they made/wrote.
Ken Thompson: B, Unix, Plan 9, Go, regexes, UTF8, QED, ed, chess endgames, Inferno, "Reflections on Trusting Trust"
Dennis Richie: B, C, Unix (inc. man pages?), Plan 9, Inferno, Limbo, "The C Programming Language"
Brian Kernighan: awk, "The C Programming Language" (including "Hello, world!"), "The Go Programming Language", "The Elements of Programming Style", "The Practice of Programming", "The Unix Programming Environment"
Rob Pike: Plan 9, Go , Inferno, Limbo, Newsqueak, sam, acme, Sawsall, "The Unix Programming Environment", "The Practice of Programming"
Q13: What order are deferreds called in?
Last in, first out. Then exit the function, and so on up the stack.
Q14: What happens if a panic happens, a deferred is called, and the deferredpanics?
It prints nested panics informationally, but continues to pop the deferreds
Q15: map[x] = y panics if map is a nil map, but slice = append(slice, 1) works fine if slice is a nil slice. Why? I feel like I'm being nickle-and-dimed by Go that the zero value panics.
Both slice and map suck if they're nil. It's just that slice is so bad (normal use case of append panics even for non-nil values) that they added a library append function, which happened to deal with the nil case too.
You can write a map_set which returns a new map much like append. You can't write a better map, because there's no operator overloading (see also Q17)
Q16: Why is the *p vs p method consistency principle a thing?
Because a.Method() notation sugars between the two, but interfaces don't. You want at least one of *p and p to support an interface.
Q17: Is there operator overloading?
No.
And Go has a broader principle that none of the core language calls any specific method name (String(), Error(), etc), which came up in the 1.23 iterator design.
Q18: Is there function overloading? (range, map.get, json.Marshal, type assertion)
Map lookup, type assertion, and channel receive are keyword-level overloading, not functions. They are special cases.
In general, a function has to take the same number of inputs and return the same number of outputs, of the same types. There is one exception, which is that one of the inputs can be variadic--for example, the built-in function make.
1.6 (2016) answer: BUT, you can "return" a generic type like interface{} (which the user has to cast unsafely to the right type) or modify one of the inputs (which can be something like interface{}). The latter is how json.Marshal works and knows what type to deserialize. To compliment this, you can do runtime inspect of types through a select statement or the reflect module.
1.18 (2022) answer: Same for number of arguments, but also functions can now be generic (ex. type A -> A). If only the return type varies, you can use named returns to do stuff with the return type. See Q24 also.
Q19: Does Go have parametric polymorphism?
1.6 (2016): No.
1.18 (2022): Yes.
Q21: Can I extend someone else's package after the fact? (ex. add new methods to json, perhaps to make it support some interface)
No. (But you can do type and interface embedding.)
Q22: What happens if I call defer inside a defer function or during a panic?
It works normally, either way.
If you create an infinite loop of deferred functions (with or without infinite panics) it does a stack overflow, and it's not obvious it was mid-panic immediately.
Q23: (p208) Why does .( type assertion return one OR two things depending? Did not seem to cover in multiple return assignments.
See Q18.
Q24: Can type switching do slices, maps, arrays, etc? (p212)
1.6 (2016): No. You need to use reflection.
1.18 (2022): Unsure. Generics were introduced, and I don't know how they interface with type switching. I think type switches only take (fully-specified) concrete types in the case statements?
Q25: Does Go have a preprocessor or macros?
No to both.
Q26: TODO: Read proposal that caused unix pipes
There wasn't a written one, I was misremembering Douglas McIlroy's suggestions as being a formal memo. The v3 vs v4 pipeline description seems interesting to compare, however. See v3, 1973 notation (p121-123, 3 pages) vs v4, 1973 (p98, one paragraph).
Q27: Is 'make' a keyword? What args does it take for each type? (Can I change what it takes for my types)
Both make and new are built-in functions, not keywords. make takes a type, and optionally size parameters, and returns that type. new takes a type and returns a pointer to a new variable of that type.
make(CHANNEL\_TYPE, size) - size defaults to 0
make(SLICE\_TYPE, size, capacity) - capacity defaults to size. (no default for size?)
make(MAP, starting size) - starting size defaults to something reasonable
new(TYPE) - only one form
Q28: Can you write 'map' in Go? (or something to join two channels)
1.6 (2016): Only awkwardly, using reflection (see Q19). Map could have the signature: map(in_list interface{}, f interface{}, out_list interface{})
1.18 (2022): Yes, both. Generics got added.
Q29: Are CSP in Go + Erlang basically the same model?
Not sure, didn't look this one up. But basically no, even if the deeper model is the same.
Erlang has out-of-order reading, indefinitely growing channel size, one unidirection 'channel' per process, and the notion of 'links' between processes to cause cascading failure.
Go has channel closing, and the notion of a specific channel size (which defaults to 0), so it's more synchronous by default.
Q30: Why is there a & in memo := &Memo{request: make(chan request)} on p278, when I thought you couldn't address constants (p159)?
It's a special case for & and new only. From Stack Overflow:
Calling the built-in function new or taking the address of a composite literal allocates storage for a variable at run time. Such an anonymous variable is referred to via a (possibly implicit) pointer indirection.
Suggested exerciae 31: (p280) Test # of goroutines and stack sizes before crash
Knock yourself out.
Suggested exercise 32: Test # of bits in an int/uint
^uint(0) >> 63 == 1
Q33: How do you detect int overlow (signed or unsigned) in Go?
While reading the book, I noticed three big problems in Go that popped out to me.
The gotchas around for-loop scoping (fixed in 2024)
The lack of generics looked really painful (fixed in 2022). Functional programming looked pretty impossible (annoying, since Go lets you pass around functions and even closures), and it looked hard to glue together channels at a high level. The book's example of memoization code was pretty bad. This mostly seems all fixed (although I'm not sure how to test "A is a B" for non-concrete B at runtime).
The number of built-in panics looked bad. In particular, I though the default value for map being nil, which panics when you try to insert something, was a dumb default. Now that I learned more, I think it's a dumb default and the default slice is dumb too.
Adding generics to the language made me much more likely to give it a whirl.